Quick start
The checkout component handles the entire checkout process including multiple payment methods, payment processing, customer information collection, and delivery address management.
In this guide, you will learn how to quickly integrate the checkout components into your React application.
For more detailed information and advanced usage, check out the Guide section.
Installation
Install using your preferred package manager:
# pnpm (recommended)
pnpm add @clickaroo/checkout-ui

# or npm
npm install @clickaroo/checkout-ui

# or yarn
yarn add @clickaroo/checkout-ui
Peer Dependencies
This library requires react (>= 16.8.0) as peer dependencies.
- npm 7+: Will automatically install them
- npm 6 / pnpm: You may need to install them manually if you see warnings
- yarn v2+: Will error if they are missing
Most React projects already have these installed, so you typically don't need to do anything extra.
Setup ClickarooProvider
The ClickarooProvider manages Clickaroo-related parameters and should be placed at the root level of your application. It automatically extracts parameters from the URL (e.g., clro_token maps to token) and stores them for subsequent requests.
Basic Usage
The ClickarooProvider should be placed at the root level of your application, and all checkout-related components should be nested inside it.
import { ClickarooProvider } from '@clickaroo/checkout-ui';

function App() {
  return (
    <ClickarooProvider>
      {/* Your app components */}
    </ClickarooProvider>
  );
}
By default, ClickarooProvider will:
- Extract all URL parameters automatically
- Store parameters to all storage types (Cookie, LocalStorage, SessionStorage) simultaneously for maximum reliability
Note: It is recommended to load
ClickarooProvideras early as possible in your application's initialization flow to ensure all URL parameters are captured correctly.
Parameter clro_token
The clro_token parameter should be provided in the URL query parameter when users navigate to the checkout page:
https://your-checkout-page.com?clro_token=YOUR_TOKEN_HERE
The token will be automatically extracted from the URL and stored for subsequent requests.
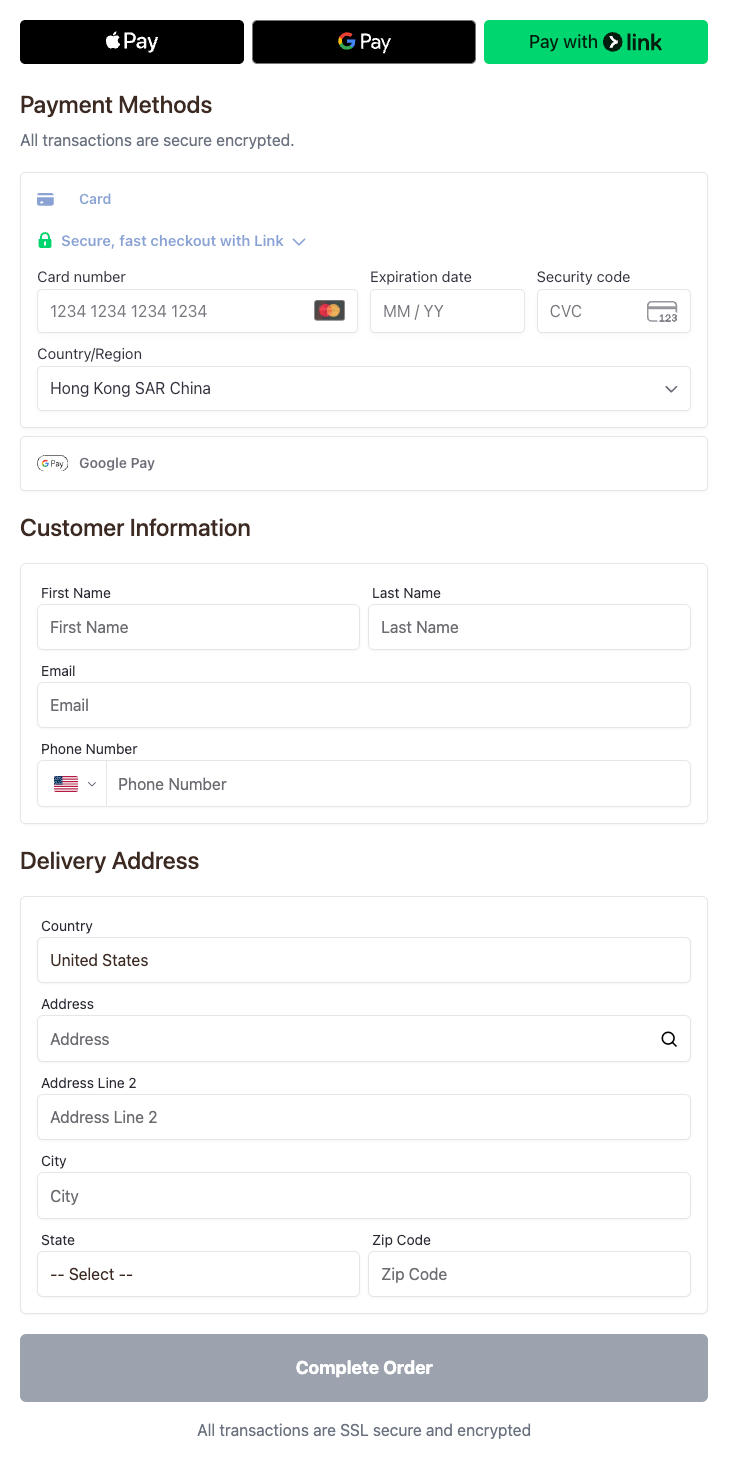
Use Checkout All in One
To quickly integrate a checkout page, use the CheckoutPage component, which provides a complete, all-in-one payment flow.
Minimal Example
Wrap your application with ClickarooProvider at the root level. Then, on your checkout page, wrap CheckoutPage with CheckoutProvider. The CheckoutProvider requires baseUrl and cart props:
import { CheckoutPage, CheckoutProvider, ClickarooProvider } from '@clickaroo/checkout-ui';

function MyCheckout() {
  const cart = [
    {
      sku: "TEST001",
      offerPricePoint: "OPP-TEST001",
    },
    {
      sku: "TEST002",
      offerPricePoint: "OPP-TEST002",
    },
  ];

  return (
    <ClickarooProvider>
      <CheckoutProvider
        baseUrl="https://api.clickaroo.io"
        cart={cart}
      >
        <CheckoutPage googleApiKey={YOUR_GOOGLE_API_KEY} />
      </CheckoutProvider>
    </ClickarooProvider>
  );
}
Each object in the cart array requires sku and offerPricePoint fields. You can optionally include additional product information (such as title, price, image, etc.), which will be saved to the order's metadata.
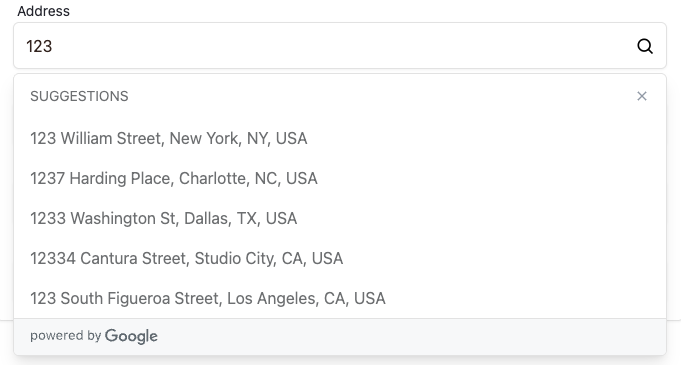
Google Address Suggestions
To enable Google address autocomplete for the delivery address field, provide a googleApiKey prop. The API key must meet the Google Places API requirements.
Express Payment Buttons
To display express payment buttons (Apple Pay, Google Pay, etc.), set the showExpressButtons prop to true on the CheckoutPage component.

Event Callbacks
The checkout process triggers callbacks at different stages, allowing you to monitor progress and implement custom logic. Here are the available callbacks in order of execution:
| Component | Callback | Description |
|---|---|---|
| CheckoutProvider | onCheckoutInit | Triggered when the checkout page initializes |
| CheckoutPage | onPaymentInfoComplete | Triggered when the user completes and validates the payment information |
| onOrderSubmit | Triggered when the user clicks the submit button (before order creation) | |
| onOrderCreated | Triggered when the order is successfully created | |
| onOrderSuccess | Triggered when the payment is successfully processed | |
| onExpressButtonClick | Triggered when an express payment button (Apple Pay, Google Pay) is clicked | |
| onExpressButtonConfirm | Triggered when express payment is confirmed |
Here's a complete example showing how to configure these callbacks:
import { CheckoutPage, CheckoutProvider, ClickarooProvider } from '@clickaroo/checkout-ui';
import { useNavigate } from 'react-router-dom';

function MyCheckout() {
  const navigate = useNavigate();

  return (
    <ClickarooProvider>
      <CheckoutProvider
        baseUrl="https://api.clickaroo.io"
        cart={[...]}
        onCheckoutInit={() => {
          console.log('Checkout initialized');
        }}
      >
        <CheckoutPage
          onPaymentInfoComplete={(cart, totalAmount) => {
            console.log('Payment info complete');
          }}
          onOrderSubmit={(cart, totalAmount, setMetadata) => {
            console.log('Order submitted');
            setMetadata({ orderSource: 'web' });
          }}
          onOrderCreated={(orderCode) => {
            console.log('Order created:', orderCode);
          }}
          onOrderSuccess={(orderCode, tradeCode) => {
            console.log('Order successful:', orderCode);
            navigate(`/finish/${orderCode}`);
          }}
          onExpressButtonClick={(event) => {
            console.log('Express button clicked');
          }}
          onExpressButtonConfirm={(event) => {
            console.log('Express payment confirmed');
          }}
        />
      </CheckoutProvider>
    </ClickarooProvider>
  );
}
Use Order Details
After the user successfully completes the payment and is redirected to the finish page, you can use the useOrderDetail hook to display order information:
import { useOrderDetail } from '@clickaroo/checkout-ui';
import { useParams } from 'react-router-dom';

function OrderCompletePage() {
  const { orderCode } = useParams();
  const { orderDetail, loading, error } = useOrderDetail(orderCode || '');

  if (loading) return <div>Loading order details...</div>;
  if (error) return <div>Error: {error}</div>;
  if (!orderDetail) return <div>Order not found</div>;

  return (
    <div>
      <h1>Order Complete!</h1>
      <p>Order Code: {orderDetail.order_code}</p>
      <p>Customer Information: {orderDetail.customer.email} {orderDetail.customer.phone}</p>
      <p>Total: {orderDetail.total_amount}</p>
      <p>Product Detail: {orderDetail.metadata}</p>
      {/* Display more order details as needed */}
    </div>
  );
}
For more advanced usage, check out the getOrderDetail API.